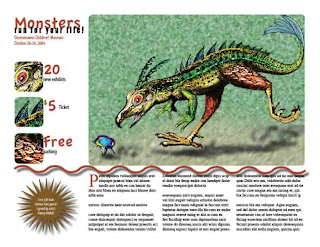
 This assignment is called monster. Software used on this program was Adobe InDesign. The purpose of this assignment is to use different type tools in InDesign and create a final product with a squiggly line with a shadow 3 columns of type, the header intersecting the sub header, the pictures with the edges cut off, and the star. The steps for the assignment is listed below.
1. Use three boxes to make three columns filled with type it should be filled with fill in type and then make the first letter go down three rows of type and make it brown.
2.then create the brown squiggly line and make a shadow underneath it.
3. Add the big picture by using command D to open up files and dragging it inside. Then place it properly and cut off the edges.
4. Use copies of the big picture to make the small pictures by copying and cutting it down to the correct size and cutting of the edges
5. Make the title and all other columns of type on the left hand side correct sizes and correct colors. Use fun type to attract kids.
6. Then make the type format the top overlap each other for a cool look.
7. Make the dollar sign for the type at the same top length as the 5 and bring the word ticket down to about halfway.
8. Then use the shape tool to create a star then paint it down and place the words inside it.
9. After checking the assignment carefully it is complete.
The type for the assignment could have been more playful to get the attention of kids. Other then that the monster project was a success.
No comments:
Post a Comment