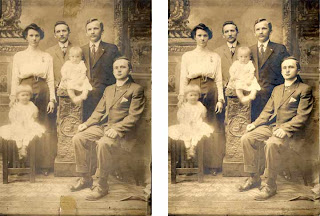
The assignment is entitled Family Picture Repair. The software used was Adobe Photoshop. The objective of this project was to restore and old picture.The tape at the top and bottom had to be removed, the gentleman sitting all the way to the right had to get his nose fixed, and dust had to be removed without lossing any historical value to the picture. The picture to the left is the before picure and the picture on the right is the after picture. Steps are lsited below.
1. Make a copy of the original and call it after.
2. Create a heal layer to use to fix the tape at the top and bottom by using cloning tool. Make sure not to destroy the signature at the bottom or line at the top.
3. Open up histories and take a snapshot.
4. Then go to Dust and Scratches and set the radius low just enough to make all the dust disappear and the Threashold high but not too high so the dust does not reappear.
5. Then take a smapshot of that and call it blur and set sources on this layer.
6. Go back to the first snapshot and use the history brush to remove all the dust.
7. Fix the side of the pages with clone tool.
8. The copy the other mans nose and use command J to jump to new layer and place it over the damage nose and fix it up to look like the damaged nose but without damage. Lower the opacity to make the real nose stand out without the damage. Then the project is complete.
It was a quick assignment but it was difficult to get all the dust. The picture was restored without casing any loss in the history of the picture.
No comments:
Post a Comment